PythonからGoogle Driveにアクセス
PythonコードからGoogle APIを使用してGoogle Driveにアクセスする方法
ライブラリインストール
最初に必要なライブラリをpipでインストールします
% pip install google-api-python-client google-auth-httplib2 google-auth-oauthlib
アプリのOAuth2.0への登録
OAuth2.0で認証するために、まずはアプリ (スクリプト)を登録する必要があります
プロジェクトの作成
Google API Consoleにアクセスします
プロジェクトの選択 -> 新しいプロジェクトと移動します

適当なプロジェクト名を入力して作成をクリックします

Drive APIの追加
作成したプロジェクトにGoogle Drive APIを追加します
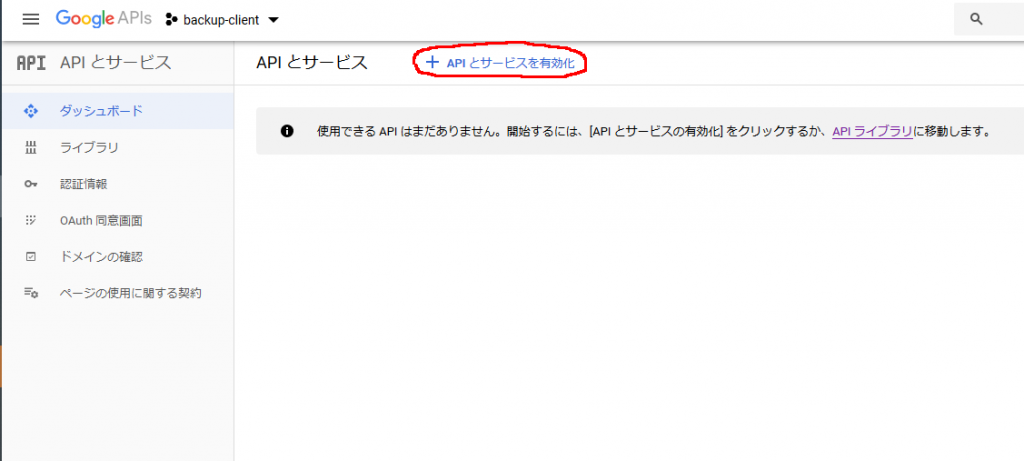
Google API Consoleでプロジェクトを選択し、ダッシュボードメニューに移動します。APIとサービスを有効化をクリックします

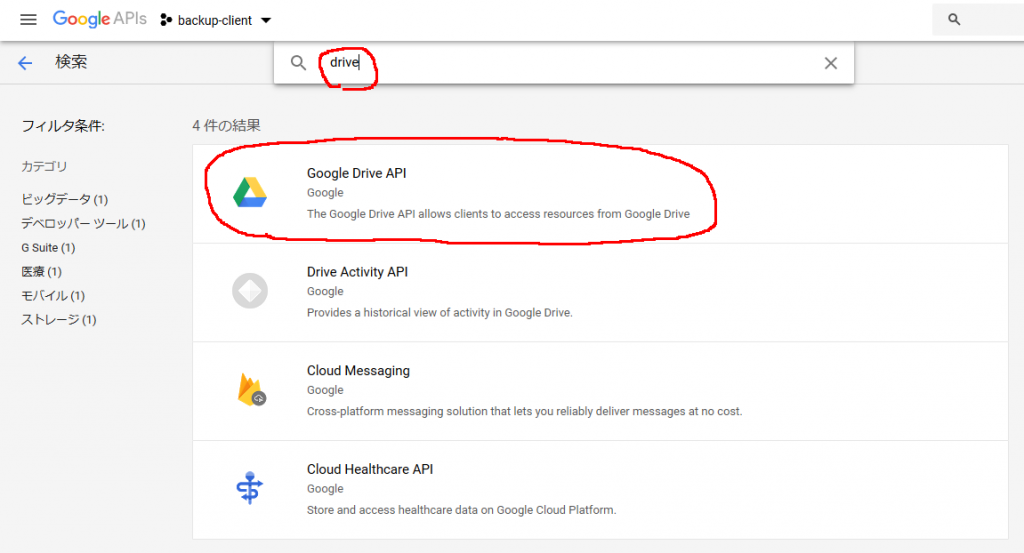
検索画面でdriveなどで検索し、出てきたGoogle Drive APIを選択します

有効にするをクリックして有効化します

クライアントIDの登録
次にOAuth2.0で使用するクライアントIDの登録を行っていきます
Google API Consoleの認証情報ページに移動し、+認証情報を作成をクリックします

同意外面を設定 -> User Type = 外部 と選択します。
OAuth同意画面では適当なアプリケーション名と同意画面に表示するメールアドレス、その他は必要に応じて記入し保存します
次にOAuthクライアントIDの作成画面が表示されるため、アプリケーションの種類にその他を選択し、適当な名前を入力しIDを作成します

最後に表示されたクライアントIDとクライアントシークレットは後程の認証時に使用します

アクセストークンの取得
作成したクライアントIDを使用して、ユーザのプライベートデータにアクセスするためのアクセストークンを取得します。Webブラウザを介したリダイレクトを用いた方法が一般てきですが、より簡易な方法としてユーザが手動でブラウザで認証画面にアクセス、取得したアクセスコードをスクリプトに入力する方法を採用します。認証フローの概要は以下の通りです
- スクリプトからGoogle Serverに認証用のURL取得を要求
- Google Serverから返された認証用URLをユーザに表示
- ユーザがURLをブラウザにコピー&ペーストして認証画面にアクセス、アクセスを許可
- 表示されたアクセスキーをユーザがスクリプトに入力
- スクリプトは入力されたアクセスキーでユーザデータにアクセス
client_secret.jsonの作成
スクリプトから読み込むclient_secret.jsonファイルを作成します。クライアントIDとシークレットキーは直接埋め込んだり、ターミナルから入力しても動作上は問題ないと思いますが、セキュリティを考慮してファイルを作成して非公開フォルダ上に保存します
適当なテキストエディタで以下のようなファイルを作成します
{
  "installed": {
      "client_id": "536255836256-da86oasdladsfkjasd7893lasdfjk3af.apps.googleusercontent.com",
      "client_secret": "UAKLDasd8faAKVCJKdkDIDVL",
      "redirect_uris": [],
      "auth_uri": "https://accounts.google.com/o/oauth2/auth",
      "token_uri": "https://accounts.google.com/o/oauth2/token"
  }
}
cilent_idとclient_secretには上記のクライアントIDの作成時に得られた文字列を設定します
テスト用スクリプト
次に実際のPythonコードを書いていきます。こちらのページにあるサンプルコードを流用します。以下のコードはアクセストークンを取得したのち、ユーザのドライブ上のファイル一覧を表示します
import pprint
import google.oauth2.credentials

from googleapiclient.discovery import build
from google_auth_oauthlib.flow import InstalledAppFlow

CLIENT_SECRETS_FILE = 'client_secret.json' # 各自のclient_secret.jsonファイルへのパスを設定
SCOPES = ['https://www.googleapis.com/auth/drive']
API_SERVICE_NAME = 'drive'
API_VERSION = 'v3'

def get_authenticated_service():
    flow = InstalledAppFlow.from_client_secrets_file(CLIENT_SECRETS_FILE, SCOPES)
    credentials = flow.run_console()
    return build(API_SERVICE_NAME, API_VERSION, credentials = credentials)

def list_drive_files(service, **kwargs):
  results = service.files().list(**kwargs).execute()
  pprint.pprint(results)

if __name__ == '__main__':
  # When running locally, disable OAuthlib's HTTPs verification. When
  # running in production *do not* leave this option enabled.
  os.environ['OAUTHLIB_INSECURE_TRANSPORT'] = '1'
  service = get_authenticated_service()
  list_drive_files(service)
スクリプトの実行
スクリプトを実行してみます
% python python/google_drive.py
Please visit this URL to authorize this application: https://accounts.google.com/o/oauth2/auth?response_type=code&client_id=536255836256-da86oasdladsfkjasd7893lasdfjk3af.apps.googleusercontent.com&redirect_uri=urn%3Aises%3Bwg%3Aiauth%3A2.0%3Aoib&scope=https%3F%2A%2Fwww.googleapis.com%2Fauth%2Fdrive&state=wo7asdlkfadsklkkeAKcWYjRlvz&prompt=consent&access_type=offline
Enter the authorization code:
次に上で表示されたURL https://...から...access_type=offlineをブラウザにコピー&ペーストして認証ページにアクセスします

アクセスを許可するアカウントを選択 (&ログイン) します
以下のような画面が表示された場合は詳細をクリックし、安全でないページに移動をクリックして先に進みます

次の画面で許可をクリックします

次の画面で表示されたコードをコピーして実行したスクリプトのEnter the authorization code:の部分に貼り付けます

Googleドライブ上のファイルのid、kind、nameなどが表示されれば成功です。 (日本語ファイル名がある場合UnicodeEncodeErrorで終了するかもしれません)
アクセストークンの保存
毎回アクセストークンを取得して入力するのは非効率ですし、このままではバックグランドタスクとして実行することができません。そこで一度取得したアクセストークンを保存して、次回以降はそのトークンを使いまわすように改良します (保存するファイル場所はセキュリティに考慮して選定する必要があります)
先ほどのget_authenticated_service()を取得したcredentialsをpickleを用いて保存、期限切れの場合は更新を試みるように修正します
import os
import pickle
from pprint import pprint

import google.oauth2.credentials

from googleapiclient.discovery import build
from google_auth_oauthlib.flow import InstalledAppFlow
from google.auth.transport.requests import Request

CLIENT_SECRETS_FILE = 'client_secret.json' # 各自のclient_secret.jsonファイルへのパスを設定
USER_CREDENTIALS_FILE = os.environ['USERNAME'] + '.credentials' #ユーザ毎の認証データ保存
SCOPES = ['https://www.googleapis.com/auth/drive']
API_SERVICE_NAME = 'drive'
API_VERSION = 'v3'

def get_authenticated_service():
    credentials = None
    if os.path.exists(USER_CREDENTIALS_FILE):  #保存したファイルがある場合はロード
        try:
            with open(USER_CREDENTIALS_FILE, 'rb') as fi:
                credentials = pickle.load(fi)

            if credentials.expired and credentials.refresh_token:
                credentials.refresh(Request())  # 期限の更新を試みる
        except EOFError as e:
            pass

    if credentials is None or not credentials.valid:
        flow = InstalledAppFlow.from_client_secrets_file(CLIENT_SECRETS_FILE, SCOPES)
        credentials = flow.run_console()

    with open(USER_CREDENTIALS_FILE, 'wb') as fo:  # 認証情報をファイルに保存
        pickle.dump(credentials, fo)

    return build(API_SERVICE_NAME, API_VERSION, credentials = credentials)
Driveへのアクセス
いよいよDriveにアクセスする準備が整いました
ファイル情報 (reference)
全ファイルの一覧を取得 (1ページ分)
service.files().list()でファイルの一覧を取得します。ドライブ以下のファイルおよび共有中の全ファイルが取得できます。pageSizeで一回のリクエストで取得するファイル数の上限を指定できます。デフォルトは100、最大値は1000です
def list_drive_files(service, **kwargs):
    results = service.files().list(**kwargs).execute()
    return results

# すべてのファイルの一覧を取得 (1ページ分)
result = list_drive_files(service, pageSize=50)
全ファイルの一覧を取得 (全ページ)
一度のリクエストで全ファイルの情報を取得出来ない場合はpageTokenパラメータでページを指定しながら順に取得していきます。レスポンスがnextPageTokenを含まない場合は最後のページです
# すべてのファイルの一覧を取得 (全ページ)
nextPageToken = None
while True:
    result = list_drive_files(service, pageSize=100, pageToken=nextPageToken)
    print(result)
    if 'nextPageToken' not in result:
        break
    nextPageToken = result['nextPageToken']
マイドライブ(トップフォルダ)にあるファイル一覧の取得
クエリーパラメータqに'root' in parentsを指定することでトップフォルダ (My Folder)のファイル一覧が取得できます
 # マイドライブ(トップフォルダ)にあるファイル一覧の取得
result = list_drive_files(service, q="'root' in parents")
指定のフォルダにあるファイル一覧を取得
指定のフォルダにファイル一覧を取得するためには、まず検索するフォルダのfileIdを取得し、その後クエリーでparentsを指定します
def get_drive_folder_id(service, folder_path):
    """指定パスフォルダのfileIdを取得"""
    parent_id = 'root'
    for name in folder_path:
        res = list_drive_files(service,
                               q=f"'{parent_id}' in parents and "
                               "mimeType = 'application/vnd.google-apps.folder' and "
                               f"name = '{name}'")
        if 'files' not in res or len(res['files']) < 1:
            return None
        parent_id = res['files'][0]['id']

    return parent_id

# 指定のフォルダにあるファイル一覧を取得
folder_id = get_drive_folder_id(service, ['tmp'])
result = list_drive_files(service, fields='*', q=f"'{folder_id}' in parents")
作成日時を取得を取得
デフォルトで得られるファイル情報はid、kind、mimeType、nameのみですが、fieldsパラメータを指定することで追加の情報を取得できます。作成日時はcreatedTimeです。その他のフィールドはこちらに記載があります
def get_drive_file(service, **kwargs):
    results = service.files().get(**kwargs).execute()
    return results

# 作成日時を取得
result = get_drive_file(service, fields='name,createdTime',
                        fileId='1voasdfjlsIJTvasABdfJPIasfda2V5h4jEhcn0oPkQ')
ファイルのダウンロード (reference)
googleapiclient.http.MediaIoBaseDownloadを使用してファイルをダウンロードします
from googleapiclient.http import MediaIoBaseDownload

def get_drive_file_info(service, path):
    """指定パスのファイル情報を取得"""
    parent_id = 'root'
    path_depth = len(path)
    info = None
    for depth, name in enumerate(path):
        if depth < (path_depth - 1):
            mimeType = "mimeType = 'application/vnd.google-apps.folder' and "
        else:
            mimeType = ""
        res = list_drive_files(service,
                               q=f"'{parent_id}' in parents and "
                               f"{mimeType} "
                               f"name = '{name}'")
        if 'files' not in res or len(res['files']) < 1:
            return None
        info = res['files'][0]
        parent_id = res['files'][0]['id']

    return info

def download_file(service, file_info, output_dir):
    """指定ファイルのダウンロード"""
    req = service.files().get_media(fileId=file_info['id'])
    with open(os.path.join(output_dir, file_info['name']), 'wb') as f:
        downloader = MediaIoBaseDownload(f, req)
        done = False
        while not done:
            status, done = downloader.next_chunk()
            print(f"Download {status.progress() * 100}%")


# 指定パスのファイルをダウンロード
file_info = get_drive_file_info(service, ['tmp', 'hoge.txt'])
download_file(service, file_info, '.')
ファイルのアップロード (reference)
googleapiclient.http.MediaFileUploadを使用してファイルをアップロードします。使用するドライブAPIはcreateです
from googleapiclient.http import MediaFileUpload

def upload_file(service, local_file, remote_folder_id='root', mimetype='text/plain'):
    media = MediaFileUpload(local_file, mimetype=mimetype)
    file = service.files().create(body={'name': os.path.basename(local_file),
                                        'parents': [remote_folder_id]},
                                  media_body=media,
                                  fields='id').execute()
    print(f'File ID: {file.get("id")}')

# 指定フォルダにファイルをアップロード
upload_folder_id = get_drive_folder_id(service, ['tmp'])
upload_file(service, './hoge.txt', upload_folder_id)
フォルダの作成
同じくcreateを使用してフォルダの作成も可能です。フォルダの作成にはmimeTypeにapplication/vnd.google-apps.folderを指定します
def drive_mkdir(service, name, parent_id):
    res = service.files().create(body={'name': name,
                                       'parents': [parent_id],
                                       'mimeType': 'application/vnd.google-apps.folder'}
                                 ).execute()

# フォルダの作成
parent_folder_id = get_drive_folder_id(service, ['tmp'])
drive_mkdir(service, 'hoge', parent_folder_id)
他にも高度な検索やファイル管理が可能な様々なAPIが利用可能ですので、詳細はリファレンスページを参照してください

最近のコメント