REST APIでPythonからGitHubにアクセス
PythonスクリプトからREST APIを介してGitHubにアクセスする方法
必要パッケージ
必要なPythonパッケージをインストールします
% pip install requests requests-oauthlib # (pip or pip3)
認証なしアクセス
公開されている情報は認証せずにアクセスすることが可能です。ただし、未認証でのアクセスは1時間に60回に制限されており、その回数で満足できるアプリは限られそうです。また少なくとも開発中は認証アクセスをすることになると思います。
from pprint import pprint
import requests as r

# 未認証でのアクセステスト
def req_wo_auth():
    url = 'https://api.github.com/users/octocat'
    response = r.request('GET', url)
    pprint(dict(response.headers))
    pprint(response.json())
    return
url = 'https://api.github.com/users/octocat'のoctocatはユーザ名です。出力は以下の通り
% python test_restapi.py
{'Accept-Ranges': 'bytes',
...
 'X-Ratelimit-Limit': '60',
 'X-Ratelimit-Remaining': '49',
...
 'x-xss-protection': '1; mode=block'}
{'avatar_url': 'https://avatars3.githubusercontent.com/u/583231?v=4',
...
 'id': 583231,
 'location': 'San Francisco',
 'login': 'octocat',
 'name': 'The Octocat',
...
 'url': 'https://api.github.com/users/octocat'}
上記ヘッダ出力部分でX-Ratelimit-Limit: '60'はアクセス可能回数、'X-Ratelimit-Remaining': '49'は残りのアクセス可能回数です。未認証のため、60回に制限されていることが確認できます
パーソナルアクセストークンによる認証
アクセスするユーザが固定されている場合は、パーソナルアクセストークンによる認証が簡単です
パーソナルアクセストークンの作成
トークンを作成するユーザでログインし、右上のメニューからSettingsを選択します

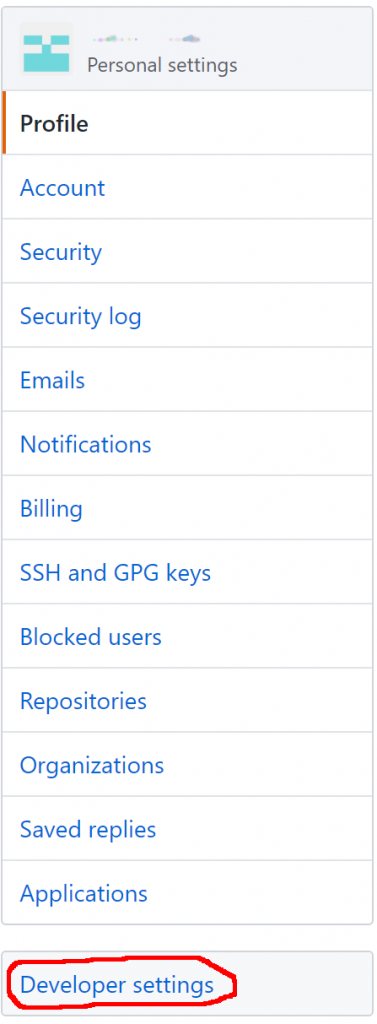
次に左のメニューからDeveloper settingsを選択します

続いて、左のメニューからPersonal access tokensを選択します

Generate new tokenをクリック

パスワードの確認画面が表示された場合、パスワードを入力して先に進みます
次にこのトークンで許可するアクセス権限を設定します。ここは各自の用途に合わせて適当に設定します。選択が完了したら、画面下にあるGenerate tokenをクリックします

下記画面で赤で囲まれた黒塗りされた文字列が生成されたトークンです

Pythonでのトークンを用いたアクセス
パーソナルトークンはBasic Authenticationを用いてユーザ名とのペアを送信します
# パーソナルアクセストークンでの認証
from requests.auth import HTTPBasicAuth
def req_w_personal_token():
    url = 'https://api.github.com/users/octocat'
    response = r.request('GET', url,
                         auth=HTTPBasicAuth('user_name',                          # ユーザ名
                                            'hfadde1234568799817209870987adbdd')) # トークン
    pprint(dict(response.headers))
    pprint(response.json())
    return
{'Access-Control-Allow-Origin': '*',
...
 'X-OAuth-Scopes': 'repo',
 'X-RateLimit-Limit': '5000',
 'X-RateLimit-Remaining': '4997',
...
 'X-XSS-Protection': '1; mode=block'}
{'avatar_url': 'https://avatars3.githubusercontent.com/u/583231?v=4',
...
 'url': 'https://api.github.com/users/octocat'}
'X-RateLimit-Limit': '5000'と認証を行ったことにより、アクセス回数が60から5000回に増加しました
Pull Request一覧を取得
プルリクエストの情報は
GET /repos/:owner/:repo/pulls
で取得できます。(例: https://api.github.com/repos/raspberrypi/linux/pulls)
# Pull Req情報取得
def get_pull_req():
    owner = 'raspberrypi'
    repo = 'linux'
    url = f'https://api.github.com/repos/{owner}/{repo}/pulls'
    response = r.get(url)  # 認証オプションは省略

    pprint(dict(response.headers))
    pprint([f'({k["state"]}) {k["number"]}: {k["title"]}'
            for k in response.json()])
出力結果
{'Access-Control-Allow-Origin': '*',
...
 'X-XSS-Protection': '1; mode=block'}
['(open) 3601: WIP: vc4_hdmi: Add CEC support for 2711',
 '(open) 3600: RFC: Test of zswap deferred initialisation',
 '(open) 3571: WIP: Backport of udmabuf and dma-heaps',
 '(open) 3544: WIP: IRS1125 sensor driver updates',
...
 '(open) 2064: v4l2 - ioctl 2 times bugfix on still mode',
 '(open) 1698: config: Add SECCOMP_FILTER and APPARMOR',
 '(open) 1675: RFC: QPU user shader support in vc4']
上記のようにデフォルトでは状態がOPENのものだけが返されます。CLOSED状態のものを取得したい場合は下記のようにstateパラメータを設定します
# Pull Req情報取得
def get_pull_req():
    owner = 'raspberrypi'
    repo = 'linux'
    url = f'https://api.github.com/repos/{owner}/{repo}/pulls'
    params = {'state': 'closed'}          # closedのものを取得
    response = r.get(url, params=params)  # 認証オプションは省略

    pprint(dict(response.headers))
    pprint([f'({k["state"]}) {k["number"]}: {k["title"]}'
            for k in response.json()])
{'Access-Control-Allow-Origin': '*',
...
 'Link': '<https://api.github.com/repositories/3199002/pulls?state=closed&page=2>; '
         'rel="next", '
         '<https://api.github.com/repositories/3199002/pulls?state=closed&page=39>; '
         'rel="last"',
...
 'X-XSS-Protection': '1; mode=block'}
['(closed) 3599: WIP: Tst ',
 '(closed) 3597: Fixing some build warnings',
...
 '(closed) 3532: Add support for the AudioInjector.net Isolated sound card']
上記のように今度はCLOSED状態のプルリクエスト情報が取得できました。
ページング
上記の例でよく見ると、すべてのCLOSEDプルリクエストが返されていないことがわかります。またヘッダにLink情報が含まれています。これは情報が一回のレスポンスでは収まり切らなかったことを示しています。コマンドにもよるようですが、GitHubはデフォルトでは一回につき30項目が返信されるようです。(参考ページ)
最初のページ以外の情報を取得するためには、pageパラメータを設定します。上記例ではrel="last"のLinkヘッダ情報からページ39が最終ページだと分かるため、試しに39ページ目を取得してみます
# Pull Req情報取得
def get_pull_req():
    owner = 'raspberrypi'
    repo = 'linux'
    url = f'https://api.github.com/repos/{owner}/{repo}/pulls'
    params = {'state': 'closed',          # closedのものを取得
              'page': '39'}               # 39ページを要求
    response = r.get(url, params=params)  # 認証オプションは省略

    pprint(dict(response.headers))
    pprint([f'({k["state"]}) {k["number"]}: {k["title"]}'
            for k in response.json()])
{'Access-Control-Allow-Origin': '*',
...
 'Link': '<https://api.github.com/repositories/3199002/pulls?state=closed&page=38>; '
         'rel="prev", '
         '<https://api.github.com/repositories/3199002/pulls?state=closed&page=1>; '
         'rel="first"',
...
 'X-XSS-Protection': '1; mode=block'}
['(closed) 133: Added ID for Atheros AR3011 found in ath3k.c.',
...
 '(closed) 15: Smsc95xx patches']
他のAPI
公式ドキュメントを参照。issueへのアクセス方法など使用可能なAPIが掲載されています

最近のコメント